Categories
Main Online Services Web Development

How To Combine Multiple RSS Feeds Into A Single Feed ? : Using Yahoo Pipes and Feedburner

Did you ever feel to mix or combine more than 1 RSS feeds into a Single Feed? Well, if yes then you can do that easily by using 2 services, Yahoo Pipes and Google Feedburner.

Multiple RSS Feeds Combined into Single One

I will guide you through the whole process of combining/Merging multiple RSS feeds into the Single One.

Procedure :

1. First of all login to pipes.yahoo.com, and click on “Create a Pipe” button.

Combine Multiple RSS Feeds Into A Single Feed Using Yahoo Pipes and Feedburner

2. Now Drag and Drop the Fetch Feed button to the working area

Combine Multiple RSS Feeds Into A Single Feed Using Yahoo Pipes and Feedburner

3. Click on Plus (+) icon, to add desired number of feeds

Combine Multiple RSS Feeds Into A Single Feed Using Yahoo Pipes and Feedburner

4. Now add the RSS feeds Links in the text-boxes, and Drag and drop the lower blue circle to the Pipe Output blue circle. (as shown below)
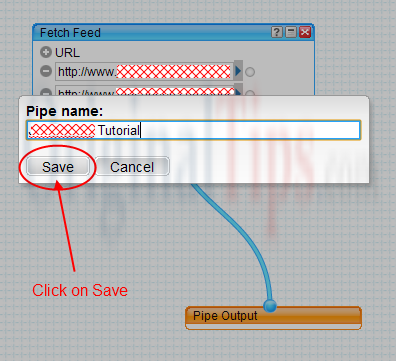
Combine Multiple RSS Feeds Into A Single Feed Using Yahoo Pipes and Feedburner

5. Save the project

Combine Multiple RSS Feeds Into A Single Feed Using Yahoo Pipes and Feedburner

6. Set a name to this project

Combine Multiple RSS Feeds Into A Single Feed Using Yahoo Pipes and Feedburner

7. Now Run the Saved Pipe, to see the implementation

Combine Multiple RSS Feeds Into A Single Feed Using Yahoo Pipes and Feedburner

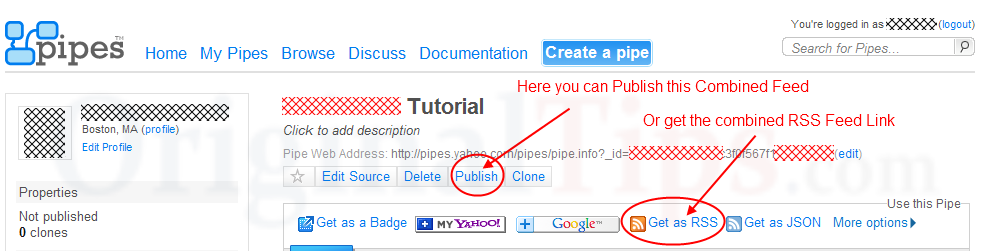
8. Here you will see a combined RSS Feed. You can publish the RSS feed to the public, and can get a link to this new RSS Feed.

Combine Multiple RSS Feeds Into A Single Feed Using Yahoo Pipes and Feedburner

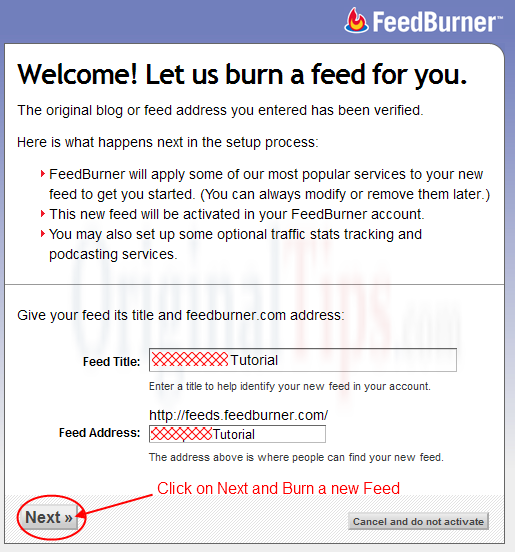
After mixing all your RSS feeds into one, you can burn it by using the Google Feedburner.

1. Login to Google Feedburner at feedburner.google.com, and enter the new RSS Link (from Yahoo Pipes)

Combine Multiple RSS Feeds Into A Single Feed Using Yahoo Pipes and Feedburner

2. Now Burn the New Feed.

Combine Multiple RSS Feeds Into A Single Feed Using Yahoo Pipes and Feedburner

We have also made a video in order to describe this process.

Hope you have enjoyed the tutorial. Please share your feedback.

Categories
Main Web Development

How To Change Default Timeout – Session Lifetime In Joomla

Most of the time you get annoyed when you automatically get logged-out from Joomla administrator panel after a certain time.

It hurts more when you are in middle of writing an article, and Joomla gets logged out without saving it. Now if you have manually saved that article then its good, but if you haven’t then you will have to write the full article again.

Here is the method to change this Default Timeout Session Lifetime :

1. Go to Joomla Administration Panel, and Login with your Credentials

2. Move your mouse cursor to Site Option. Now click on the “Global Configuration” link from the dropdown.

How To Change Default Timeout Session Lifetime In Joomla

3. Now click on System Tab

How To Change Default Timeout Session Lifetime In Joomla

4. Look for the “Session Settings“,

How To Change Default Timeout Session Lifetime In Joomla

5. Change Session Lifetime from default to 7200

How To Change Default Timeout Session Lifetime In Joomla

How To Change Default Timeout Session Lifetime In Joomla

Now your Joomla Administrator Panel will not get logged out automatically within 5 days (5*24*60 = 7200 minutes). You can also change this value to your own.

Note : As per our testing, this trick is applicable to Joomla 1.5, 1.6 and 1.7.

Categories
Computers Main Online Services Web Development

Solution for Joomla Strict Standards Error (After Installation) | Joomla 1.0, 1.5, 1.6, 1.7, 2.5 and 3

Recently we have come across a problem, which is coming to the Joomla Developers. After installing Joomla on the localhost server, developers are getting the following error on all pages of their site.

Strict Standards: Static function JDatabase::test() should not be abstract in C:\xampp\htdocs\Joomla\libraries\joomla\database\database.php

Strict Standards: Accessing static property JCache::$_handler as non static in C:\xampp\htdocs\joomla\libraries\joomla\cache\cache.php on line 420

Strict Standards: Accessing static property JCache::$_handler as non static in C:\xampp\htdocs\joomla\libraries\joomla\cache\cache.php on line 422

Please follow the below steps in order to resolve this error :

1. Visit the localhost where you have installed the Joomla. Try loading the pages. On every page, you get the error like,
Solution for Joomla 1.7 - Strict Standards Error

2. Then open the php.ini file, which is present in the php directory on your system. If you have installed XAMPP, then the location of php.ini file is “C:\xampp\php“.

3. Press CTRL+F to find error_reporting. First one is with the semi-colon (;) and second one is without the semi-colon.

4. Change that 2nd one to error_reporting = E_ALL & ~E_NOTICE

5. Set display_errors = off

6. Now go to your Control Panel of the XAMPP or WAMP. And restart the Apache Server.

Now all such errors are resolved from your site. For more help, you can watch the below video.

Note : You can add full security to your Joomla Website by purchasing the Joomla Guard.

Enjoy!

Categories
Computers Internet Virals Main Online Services Technology Web Development

10 Useful Tips for WordPress Plugins Developers to Enter into WordPress Extend Directory

WordPress is a most popular blogging platform, and all wordpress developers want their plugin/theme to be in WordPress Extend Directory.

Developing WordPress Plugins and Themes and Uploading it to WordPress Extend Directory

There are thousands of developers who design wordpress themes and plugins, but wordpress has number of restrictions if they want to upload their creation to the WordPress Extend directory, due to which many developers can’t post their products into it. This article will give a strong benefit to such developers.

Here are the key points you should remember while developing a plugin. You will become eligible to enter into the WordPress Directory, after implementing these steps into your product.

1. All the code in the plugin files must be unique. Files containing copied codes from other plugins/themes are not acceptable.

2. All the code in the plugin files must be visible to everyone. No obfuscated or encoded text is permitted anywhere in the product.

3. All Code must be virus free and doesn’t contain any malicious code in it

4. Adding or embedding ads in the user’s admin area is not permitted.

5. Selling the Ad-Space in the user’s admin area is not allowed.

6. Tracking users is not permitted

7. Use of iFrame is restricted to WordPress

8. If footer note (Attribution) is being added to the user’s website, then it must be optional and visible to the users. So that if they don’t want to show the footer text, they can disable it.

9. You must add the GPL License to the code.

This program is free software: you can redistribute it and/or modify
it under the terms of the GNU General Public License as published by
the Free Software Foundation, either version 3 of the License, or
(at your option) any later version.

This program is distributed in the hope that it will be useful,
but WITHOUT ANY WARRANTY; without even the implied warranty of
MERCHANTABILITY or FITNESS FOR A PARTICULAR PURPOSE. See the
GNU General Public License for more details.

You should have received a copy of the GNU General Public License
along with this program. If not, see http://www.gnu.org/licenses.

10. Product should be useful and user-friendly.

For all guidelines, please visit http://wordpress.org/extend/plugins/about/guidelines/.

Happy Coding! 🙂