Categories
Computers Main Operating Systems Windows

New Windows 8 Keyboard Shortcuts / Keys : Official List from Microsoft (Updated)

As you already know, Windows is a most used Operating System, due to its GUI and user-friendliness. Recently Microsoft has released the Consumer Preview Version of Windows 8.

Microsoft always tries to make Windows faster and easier to use. For the same reason now they have introduced the Official Shortcut Keys for the Windows 8 Edition.

Windows 8 Developer Preview Edition Start Screen

Here is the List of Shortcuts of Windows 8 Edition.

Shortcuts starting with Windows Key :

Windows Key Keyboard Shortcuts on Windows 8 Edition
  1. Windows Key : Open the Start Screen
  2. Win + Z : Open Application bar
  3. Win + W : Search in Settings of the system
  4. Win + X : Open Windows Mobility Center
  5. Win + V : Switch among notifications
  6. Win + Shift + V : Switch among notifications (in reverse manner)
  7. Win + U : Open Ease of Access Center
  8. Win + T : Set focus to Taskbar and toggle through Programs
  9. Win + S : Open OneNote Screenshot Creator (If Microsoft Office-OneNote is installed)
  10. Win + R : Open Run dialog box
  11. Win + Q : Open Windows Apps Search
  12. Win + P : Display Projection Options
  13. Win + O : Disable screen rotation / orientation
  14. Win + N : Create new OneNote (If Microsoft Office-OneNote is installed)
  15. Win + M : Minimize all windows
  16. Win + Shift + M : Restore minimized windows
  17. Win + L : Lock your computer
  18. Win + K : Open Device Connections
  19. Win + J : Toggle foreground between the filled and snapped applications
  20. Win + I : Open Settings Panel (To change Settings for the Wireless Networks, Volume, Apps, Brightness or to Shut Down)
  21. Win + H : Open Share Panel
  22. Win + G : Toggle through Windows Desktop Gadgets
  23. Win + F : Search for the Files in Computer
  24. Win + Ctrl + F : Search for Computers in a network
  25. Win + E : Show Windows Explorer with File’s Tree View
  26. Win + D : Toggle “Show Desktop”
  27. Win + C : Open Charms bar
  28. Win + B : Set focus to Notification Area
  29. Win + Enter : Open Windows Narrator
  30. Win + Alt + Enter : Open Media Center (If Media Center is Installed on PC)
  31. Win + Spacebar : Change the Keyboard Layout / Input Language
  32. Win + PageUp : Move Start Screen to the left side of screen
  33. Win + PageDown : Move Start Screen to the right side of screen
  34. Win + Plus : Magnifier Zoom-In
  35. Win + Minus : Magnifier Zoom-Out
  36. Win + Esc : Close Magnifier
  37. Win + Left Arrow : Dock the current window to left half of the screen
  38. Win + Right Arrow : Dock the current window to right half of the screen
  39. Win + Up Arrow : Maximize the currently active window
  40. Win + Down Arrow : Minimize / Restore the currently active window
  41. Win + Shift + Up Arrow : Maximize the currently active window vertically, while maintaining its width
  42. Win + Shift + Down Arrow : Minimize / Restore the currently active window vertically, while maintaining its width
  43. Win + Shift + Left Arrow : Move the currently active window to the left side of monitor
  44. Win + Shift + Right Arrow : Move the currently active window to the right side of monitor
  45. Win + Home : Toggle (Minimize/Maximize) all non-active windows
  46. Windows + number : Launch the program from taskbar sequence (e.g. To open 1st program window, use Windows + 1)
  47. Windows + Shift + number : Launch a new instance of the currently active program from taskbar sequence (e.g. To open an instance of 1st program window, use Windows + Shift + 1)
  48. Win + Break : Display System Properties dialog box
  49. Win + F1 : Open Windows Help and Support
  50. Win + Forward Slash (/) : Initiate IME (Input Method Editor) reconversion
  51. Win + Tab : Toggle through all Applications
  52. Win + Ctrl + Tab : Toggle through Applications and snap them as they cycle
  53. Win + Shift + Tab : Toggle through Applications in reverse order
  54. Win + Dot (.) : Move the gutter to the right
  55. Win + Shift + Dot (.) : Move the gutter to the left
  56. Win + Comma (,) : Look Temporarily at the desktop

Shortcuts starting with Alt Key :

Alt Key Keyboard Shortcuts on Windows 8 Edition

  1. Alt + W : Create a new document or select a template
  2. Alt + V : Paste
  3. Alt + T : Cut
  4. Alt + S + N : Deselect
  5. Alt + S + I : Invert the selection
  6. Alt + S + A : Select all
  7. Alt + R : Rename selected files
  8. Alt + P + S : Insert label
  9. Alt + P + R : Open properties
  10. Alt + P + E : Display “Open With…” dialog box
  11. Alt + N : Create a new folder
  12. Alt + M : Move the files
  13. Alt + H : Show the history of file versions
  14. Alt + E : Edit selected files
  15. Alt + D : Delete selected files or folder
  16. Alt + C + P : Copy path to the file or folder
  17. Alt + C + O : Copy selected items
  18. Alt + A : Open the “special features”

Hope you have enjoyed the list of shortcuts. Please share your feedback.

Categories
Computers Education Ethical Hacking Windows

How to Remove or Reset the Content Advisor Password in Windows Internet Explorer ?

Content Advisor Password is a nice choice to restrict the use of internet. For example, if you want to keep your children away from some particular sites, or all of sites, then you can set the Content Advisor Password on Internet Explorer.

But if you have forgotten the password and want to disable that Content Advisor on internet explorer, then you can do it by the following simple method.

How to Remove or Reset the Windows Content Advisor Password

1. Open regedit.exe (Start > Run > (write regedit) > hit Enter)
2. Now navigate to key

HKEY_LOCAL_MACHINE\SOFTWARE\Microsoft\Windows\CurrentVersion
\Policies\Ratings

3. Delete the entry Key and Hint.

4. Then restart your computer.

Now you will see that the Content Advisor Password is not enabled anymore.

Categories
Entertainment & Fun Internet Virals Main Media Mobile Phones News Windows

Nokia Lumia 800 – An Amazing Smartphone from Nokia | Price, Specifications and Reviews

Finally Nokia has joined the mobile phone battle, by announcing its new Phone Model – Lumia 800.

Nokia Lumia 800 Launched

Lumia 800 is the first mobile phone from Nokia that has Windows Phone OS in it. Earlier Nokia was presenting mobile phones with their own Operating Systems (Symbian and MeeGo). The last successful phone from Nokia was N800, which was released about 3 years ago.

Nokia Lumia 800 Price and specifications with pictures

But now with the popularity of Windows Phone OS, New Nokia Lumia 800 has also gained a huge popularity among folks, whether businessman or teenagers.

Specifications :

Nokia Lumia 800
Nokia Lumia 800

Nokia Lumia 800 comes with Windows 7.5 Mango Operating System, with 3.7 inch AMOLED and Capacitive Multi-Touchscreen. Lumia 800 screen is protected with Gorilla Glass, which is the strongest material for Phones’ Screen. The device screen has 16 million colors with a screen resolution of 480×800 pixels.

Nokia Lumia 800
Nokia Lumia 800

Lumia 800 has a 1.4Ghz Scorpion CPU, Qualcomm MSM8255 Snapdragon Chipset and Adreno 205 GPU.
While talking about the memory, Nokia Lumia 800 has 16GB internal storage, but no external SD Card Allowed. To speedup the processes in the phone, it has 512 MB RAM.

In terms of Connectivity, Nokia Lumia 800 has Wi-Fi, 3G, MicroUSB Support, and Bluetooth with EDR and A2DP (version 2.1). Nokia Lumia 800 has an 8 Mega-Pixel Camera, with Carl-Zeiss Optics, Autofocus and Dual LED Flash.

Nokia Lumia 800 with Carl-Zeiss Optics, Autofocus and Dual LED Flash

To increase the users base, Nokia has also improved their App-Store, and renamed the earlier Ovi store to Nokia App Store. Nokia App Store consists of a number of quality mobile apps. Though the apps can’t be compared with iPhone Store and Android Market, but still, they are trying to come into the competition.

Price : Rs. 28500 ($550)

In-spite of a number of features, Nokia Lumia 800 has given a few disappointments, like
1. No front camera for video-chatting even though the phone supports 3G.
2. Upto 730p HD Videos can only be played in Nokia Lumia 800, while other phones like Galaxy Note can play HD videos at even 1080p.
3. The price of Lumia 800 is also quite high, as compared to the other phones with similar features present in the market.

Categories
Computers General Awereness Main Windows

Speccy – See Full Configuration of your Computer System Hardware – Informational Tool

I received many queries from our readers asking about some method by which they can verify configuration of their system. Though I replied them one by one, but then I decided to write an article about it, so that more and more people can take benefit from it.

Speccy is a System Software, which provides full statistics about every hardware along with their Brand and Manufacturers.

For example, Speccy displays full information about,

* Motherboard,
* CPU
* RAM (Random Access Mamory)
* HDD (Hard Disks) with RPM
* FDD
* Graphics Card (Both Internal and External)
* Audio support
* Keyborads and Mouse
* Optical Drives and, every hardware of the computer.

Speccy for Windows Showing System Summary
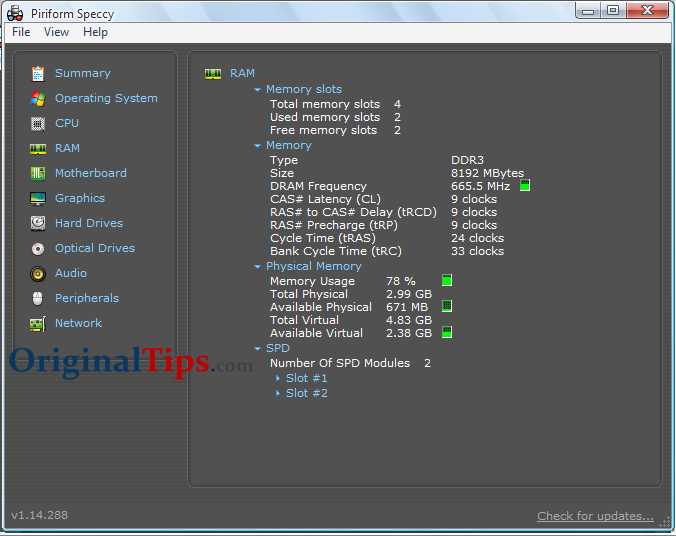
Speccy for Windows Showing RAM Specifications
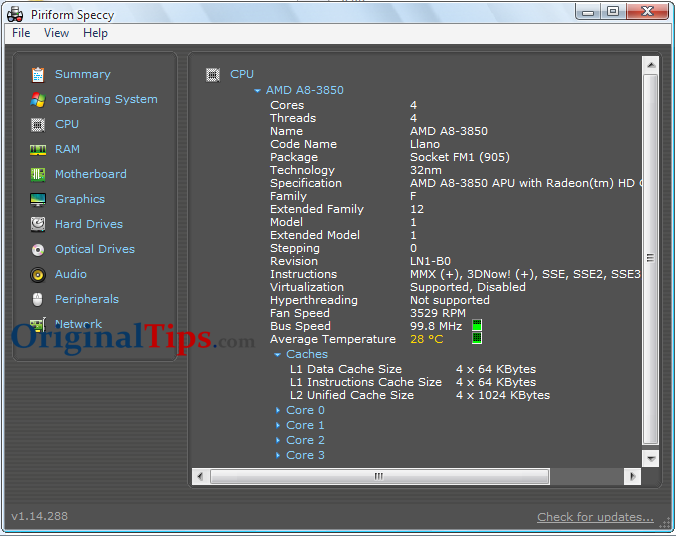
Speccy for Windows Showing CPU Specifications

Speccy also provides the temperature details about system hardware, so that the components could be saved from overheat.

Though this application helps a lot to the experienced users and administrators, but it can also help the normal users in daily life.
e.g. Before buying more RAM for your computer, you can see how much memory is installed, and how many extra slots it has.

Speccy is available in many languages, and can be installed on all Windows Operating Systems (32-Bit and 64-Bit).

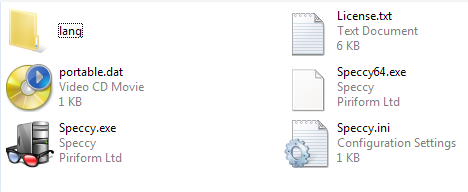
Speccy for Windows 32-bit and 64-bit

To download Speccy, you can visit their official website (http://www.piriform.com/speccy).

Categories
Computers General Awereness Office Operating Systems Technology Windows

What is the Difference between 32 Bit and 64 Bit Operating Systems (OS) / Software ?

We receive number of emails from our subscribers asking, “What is the difference between 32-Bit (x86) and 64-Bit (x64) processors” ?

32Bit vs 64Bit
32Bit vs 64Bit

Well, after running a survey, we found it surprising that many of the people are confused about which type of computer should they purchase, what bit system they require!

I think this article may help those, who want to choose a correct machine, according to their usage.

As per our survey, most of the people are running 32 Bit operating systems. But as the hardware is going cheaper, their curiosity is also increasing about working with 64 Bit operating system. Now lets take a look at the differences between the 32-Bit and 64-Bit OS.

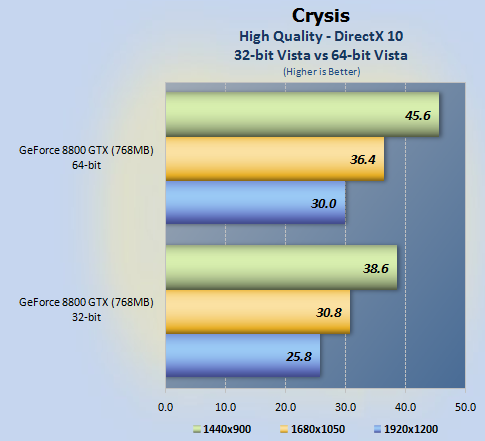
1. 32-Bit operating systems can run on both 32-Bit processors and 64-Bit processors, while 64-Bit OS can only be run on 64-Bit processor. 64-Bit processors handles larger chunks of data as compared to 32-Bit processors. This is the only reason that they are very fast as compared to the 32-Bit.

2. In a 32-Bit Operating system, the maximum RAM could be used is 3GB, while in 64-Bit Operating systems you can use as much RAM as you want (Starting from 4GB to 256TB). If you have installed more than 3GB RAM in the 32-Bit Operating System, then its properties will show something like this,

Screenshot on 32-Bit Operating System with 4GB RAM.

4GB Ram in 32-Bit Operating System (4GB Installed, 3GB Usable)

Screenshot on 64-Bit Operating System with 8GB RAM.

8GB Ram in 64-Bit Operating System (8GB Installed, 8GB Usable)

3. Although you can run most of the 32-Bit applications on 64-Bit system, but there are many programs which needs to be 64-Bit if you want to run them on a 64-Bit system. However in opposite to this, 64-Bit programs can’t be run on 32-Bit OS.

4. Earlier 64-Bit OS driver support was poor, due to which people were facing compatibility issues. But now most of the companies are developing two versions of each application (32-Bit and 64-Bit). So there is no need to worry about the compatibility in 64-Bit OS.

Conclusion:

If you don’t use hevay applications and 3GB RAM is sufficient for you, then you should use a 32-Bit operating system. But if you use heavy and graphical applications like AutoCAD, Video Editors, Heavy Programming IDEs then using 64-Bit Operating system can give a lot of benefits.

You can also install most of the 32-Bit applications (not all) on 64-Bit Operating System. When you do that there will be two directories for the installed program files.

For example : In Windows 7 (64-Bit), you will see “Program Files” and “Program Files (x86)”. x86 is an alias for 32-Bit operating system.

Categories
Computers Entertainment & Fun Operating Systems Windows

How to Find Microsoft Windows Version Quickly ?

The quickest methods to find out which version of Microsoft Windows you are using, is winver command.

Open the Run Dialog by pressing CTRL+R, and enter the command winver in it. This will open a window titled About Windows.

This windows will provide you information like the OS installed on your PC, its build version, Service Pack, year of coding of OS, physical memory (RAM) available to windows etc.

Winver

This will also help you telling these specifications, when someone from technical support asks you to troubleshoot your system.

Categories
Main Operating Systems Windows

Download Windows 8 Consumer Preview Edition and Developer Preview Edition with Developer Tools

For a normal user, Microsoft Windows is already on the top of all Operating Systems.

Now Microsoft has released Windows 8 (x86 or 32-Bit) and (x64 or 64-Bit) – Developer and Consumer Preview Edition.

Download Microsoft Windows 8 Developer Preview Operating System

Though Windows 8 could be used for all purposes as we use Windows 7, Vista, XP etc., but as this is a pre-beta release of Windows 8, so we suggest you to install this version of Windows 8 to a separate partition, for the testing purposes.

Soon Microsoft will release the full and stable version of Windows 8, then you can install it on the production system or workstation.

If you are a developer, then you can create apps for Windows 8 by using the Developer Tools SDK available at Microsoft Website.

As per Microsoft Official Statement, Windows 8 is far better than the previous version of Windows like Windows 7, Vista, XP and all. Windows 8 Chip design is improved a lot, due to which one can experience very nice performance of the computer by using the same hardware as he is using for Windows 7.

To download the Windows 8 Consumer Preview Version (x86 and x64), please visit http://windows.microsoft.com/en-US/windows-8/download.

To download Developer Preview Version (x86 and x64), please visit http://msdn.microsoft.com/en-us/windows/apps/br229516.

Enjoy!

Categories
Main Operating Systems Portable Drives Technology Windows

How to install Windows XP on Pen Drive / USB Flash Drive

There are many reasons to install Windows XP on the USB Pendrive. For example, if you have a Laptop/Netbook, which doesn’t have CD/DVD-ROM in it, then you can run Windows XP from the USB Drive.

The simplest tool which can be used for his purpose is SARDU – Multiboot CD/DVD and USB Builder.

SARDU Software
SARDU Software

Here is the procedure to install Windows XP on a USB Drive.

1. Make an ISO file of your Windows XP Operating System Disc, and rename it to Win_XP_Pro.iso or Win_XP_64.iso or Win_XP_Home.iso etc. You can do it via any ISO Creator (for example, Magic ISO, Ultra ISO, LC ISO (Free) etc.).

2. Now download the SARDU, unzip it. Now copy the XP’s ISO file (Win_XP_*.iso) to the folder SARDU/ISO

SARDU USB Windows Installer

3. Now run SARDU software, go to the Windows Tab, and check the Windows Installer ISO file.

4. Now click on Search USB and choose the Drive from that list.

SARDU - Select USB, and Hit on Create

5. Then click onto the USB Button to install the Windows XP on USB.

Now you have Windows XP in your USB Pen Drive.