William is a Web Enthusiast. He likes to post articles about almost every topic, and love to mess with the latest technological gadgets, so that he can share his experience with the whole world.
Google Account Services - Application Specific Passwords
Application Specific Password is a type of security provided by Google, by which you can choose different passwords for accessing different applications. This service is mandatory for such applications, which can’t ask you the verification codes.
For Example : You can create separate password for accessing,
1. For accessing Google Services on Android, iPhone, or Blackberry
2. To Log-in to Android Market from your Mobile Phone or Tablet PC
3. To Sign-in on Chat Clients like GTalk, Aim etc.
4. To Log-in on E-Mail Clients like Microsoft Outlook, Thunderbird etc.
5. To Sync Chrome (between Android and Desktop), and so on.
We often use computer at a friend’s home, in Office, College and in Cyber Cafe. But we can’t rely on the security of that system. There could be key-loggers or Trojan Horses installed on it, which can record your each activity and send it to the wrong hands.
Please note Keyloggers have nothing to do with the strong password. They can record all your activities, including usernames, passwords, and what sites you have accessed etc.
To overcome this thing, Google provides an extra layer of security known as 2-Step Verification. After activating this service, first of all you need to enter your login credentials and thereafter, you need to verify the login by the security code received on your mobile phone.
To activate Google 2-Step Verification, you can follow these steps :
1. Sign in to your Google Account
How To Protect Your Google/GMail Account From Hackers, Even If They Hack Your Password : Step by Step Guide
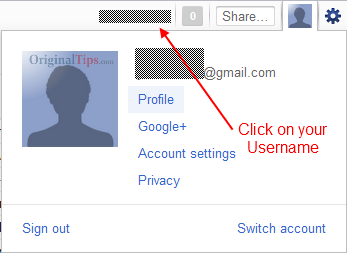
2. Click on your Username
How To Protect Your Google/GMail Account From Hackers, Even If They Hack Your Password : Step by Step Guide
3. Go to the Account Settings
How To Protect Your Google/GMail Account From Hackers, Even If They Hack Your Password : Step by Step Guide
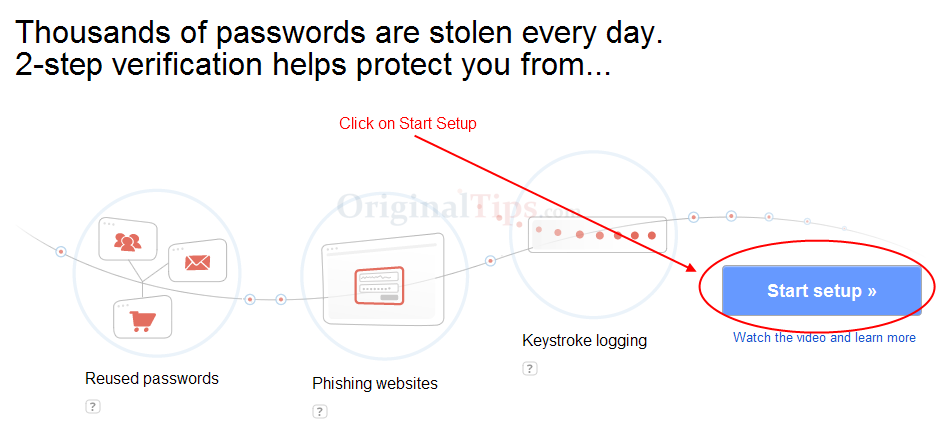
4. On the Account Settings page, you will get an option by the name “Using 2-step verification”. Click on the edit button.
5. Click on Start Setup
How To Protect Your Google/GMail Account From Hackers, Even If They Hack Your Password : Step by Step Guide
6. Select Country, Update your Mobile Phone Number and Send code button.
How To Protect Your Google/GMail Account From Hackers, Even If They Hack Your Password : Step by Step Guide
7. Enter and verify the code received on your mobile phone.
How To Protect Your Google/GMail Account From Hackers, Even If They Hack Your Password : Step by Step GuideHow To Protect Your Google/GMail Account From Hackers, Even If They Hack Your Password : Step by Step Guide
8. Remember Cookie on Computer for 30 Days :
If you are using 2-Step Google Services at your home itself, then this 2-step verification could be annoying. So to get rid of this, you can tick on the option “Remember this computer for 30 days”. This option will save a cookie in the browser for 30 days.
How To Protect Your Google/GMail Account From Hackers, Even If They Hack Your Password : Step by Step Guide
9. Turn On 2-Step Verification :
How To Protect Your Google/GMail Account From Hackers, Even If They Hack Your Password : Step by Step Guide
So your 2-Step verification has been successfully setup.
Now whenever you login to your Google Account (any google service), you will need to enter do this verification.
If you have an High Definition Television and thinking which DTH Package would be more suitable for it to enjoy the HD-Channels with superior quality, then you’re on the right page.
DTH Service Providers Comparison : Tata Sky Plus HD vs Dish TV TruHD Plus, Reliance Digital TV, Airtel Digital TV and Videocon D2H
We will give you a little comparison among famous DTH Service Providers.
At present the DTH providers (like Tata Sky, Dish TV, Reliance Digital TV, Videocon D2H and AirTel Digital TV) are giving only a few HD channels.
HD Channels List :
1. NATIONAL GEOGRAPHIC HD
2. ESPN HD
3. DISCOVERY HD
4. STAR MOVIES HD
5. STAR GOLD HD
6. Star Plus HD
The above HD Channels come with 1080i Resolution, 5.1 Surround Sound, and 16:9 aspect ratio.
Here is the Comparison between Tata Sky+ HD and Dish TV True HD+ :
Tata Sky+ HD :
1. HD Channels Subscription Pack is available at a cheaper pack [starting from Rs.150 per month]
2. One Year All Channels Pack is available at Rs.11016 with free Set-top box, installations charges
3. Tata Set Top Box costs Rs. 5990 with free 1 month subscription
4. Tata Sky Customer Support is very good
Dish TV True HD+ :
1. HD Channels Subscription Pack is available starting from Rs.375 per month
2. The Set Top Box price for Dish TV True HD+ is Rs. 2990 (Set Top box-Rs.2690 + Remote-Rs.300), which is comparatively low, but an external Hard-Disk drive is required to Record Live TV. (You can use any USB device from 2GB to 2TB)
3. Customer Support is poor
Other DTH Service Providers like Reliance Digital TV, Airtel Digital TV and Videocon D2H are also offering good High-Definition Channel packs, but TATA Sky+ HD is cheaper than all of them.
Google has recently launched a stable update to their Chrome Desktop Browser, with many added features and fix to a number of security vulnerabilities.
There are mainly 2 new features provided, Document Scanning and Omnibox Prerendering.
Google Chrome 17 - Config chrome flags screenshot
1. Download File Scanning :
Whenever you download something by using Google Chrome browser, Chrome will check the file in its list. If file is hosted on the Blacklisted Servers/Websites or appears to be an infected one, then Chrome will warn you that the file consists of malware or viruses. This new layer of protection also works for .exe and .msi extension files.
This feature is provided for your security, but if you believe that the file you are downloading is safe, then you can download it by selecting the option.
2. Ultra fast browsing via Pre-Rendering :
Google Chrome 17 comes with Pre-Rendering enabled. If you have activated the Pre-Rendering option, then it will appear that the sites you are surfing are loading instantaneously. To disable this feature, you can go to chrome://flags/ in the chrome address bar, and select Disable option under Prerender from omnibox.
Google Chrome 17 flags new features - prerender from omnibox and smooth scrolling
3. Smooth Scrolling :
Google Chrome has provided Smooth Scrolling as an experimental feature, just like the Firefox 12 Aurora.
4. Security Fixes :
In terms of security, Google Chrome 17 has around 20 security vulnerability fixed, out of which a few were severe.
5. Synchronization with Chrome Beta for Android :
You can login into your Chrome profile, and share from PC to mobile, or from mobile to PC.
Google Chrome 17 Synchronization Sign in Snapshot
Please share your reviews after installing the new version of Google Chrome.
Google always invents something new to provide better experience to the worldwide internet users.
After the success of Google Chrome – A Superfast Desktop Browser, Google has come up with an Android Version of Chrome Browser, so that people can take benefit of it on their mobile phones and tablet as well.
Google Chrome Beta for Android Devices
Here are some advantages and disadvantages noticed by us.
Advantages :
1. Chrome Beta for Android is superfast, with accelerated page loading, zooming and scrolling – just like the Desktop version of Chrome.
2. Provides the same tabbed interface as provided in the Desktop version
3. Performs automatic synchronization of the tabs and bookmarks (After Sign-in)
4. Comes with the Omnibox feature which lets you search and surf through the same address bar
5. You can surf privately with the Private Browsing Mode (Incognito Mode) in Chrome Beta
6. Switch between unlimited tabs in a easy-viewable stack
7. You can send webpages from your Desktop Chrome to your Android Device, and read them on the go (even if you are offline).
Limitations :
At the time of writing, Google Chrome Browser (Beta) has the below limitations,
1. Chrome for Android is Only available for Android 4.0 Ice Cream Sandwich Version based Mobile Phones annd Tablets
2. It can only be installed in United States, Canada, United Kingdom, Australia, Japan, Brazil, Korea, Mexico, Spain, France, Germany and Argentina
3. Beta version doesn’t have Flash Support
4. There is no option provided to switch to the Destop version of a website
5. It doesn’t have any support for features like Themes, extensions etc.
To continue the war in mobile phone market, the South Korean company LG have launched 2 new phones – LG Optimus Hub (E510) and LG Optimus Sol (E730). Both the phones run on Google Android 2.3 Gingerbread OS.
LG Optimus Sol has 3.8 inch Multi-Touch Screen, “Ultra AMOLED Display”, which provides 2-times better display than the AMOLED one. Ultra Amoled display lowers the screen quality degradation and provides a better experience outdoors (even in the Sunlight). The Screen resolution of LG Optimus Sol is 800×480 pixels. Coming to the other features, Optimus Sol is 9.8mm thin, equipped with 1GHz processor, 5MP Auto-focus camera, 3G, Wi-Fi/WLAN, Wi-Fi Hotspot feature, GPS, and DLNA.
LG Optimus Hub has 3.5 inch TFT Capacitive Multi-Touch Screen, 5MP autofocus camera with 4x digital zoom and face detection. LG Optimus Hub has 800Mhz processor, 512MB RAM with Adreno 200 GPU.
Other features of LG Optimus Hub include 3G, Wi-Fi, and Wi-Fi hotspot.
LG Optimus Hub (E510) comes at a Price of Rs.14500 / $290, while LG Optimus Sol (E730) is available at Rs.19000 / $380.
Mozilla Firefox browser is famous for its user-interface, support and security. Though the Firefox browser is open-source and free-to-use, but due to the hard work of Mozilla developers, no one can say that Firefox works like free browser. Firefox provides everything that a paid browser can provide (like Microsoft Internet Explorer).
This time Mozilla is launching a new update by the name Firefox 12 Aurora, which provides a better experience than the previous versions of it.
Here is a short list of benefits :
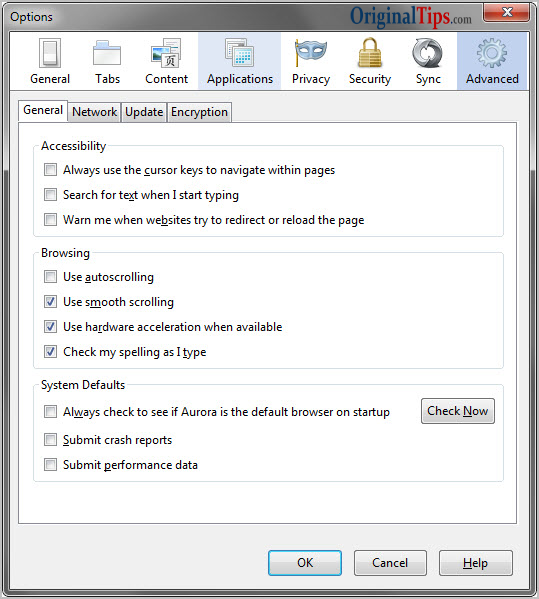
1. Smooth-Scrolling & Auto-Scrolling :
Firefox 12 has Smooth-Scrolling enabled by default. Though the feature is provided to improve the Scrollinmg experience of the users. But if you don’t like this then you can disable this feature from
Mozilla Firefox > Options > Advanced > General > Use Smooth Scrolling
2. New CSS Properties Support :
Firefox 12 Supports new CSS properties like column-fill, and text-align-last. So the web developers can use these properties in their web-pages. Additionally the experimental features like ECMAScript 6 Map and Set objects, and Sharp Variables Support are introduced in Firefox 12.
3. Source Code line numbering :
The another feature of Firefox 12 is Source Code line numbering, which will help the developers in debugging the source code of web-pages.
4. Less User-Command while Updating :
The new Firefox 12 will prompt one less user-command in its up-gradation process.
Personal Suggestion :
I suggest you to test the New Firefox 12 Version and report to the Firefox authority, if you see any kind of errors in it. This will help the Firefox 12 beta to become a Stable version.
Content Advisor Password is a nice choice to restrict the use of internet. For example, if you want to keep your children away from some particular sites, or all of sites, then you can set the Content Advisor Password on Internet Explorer.
But if you have forgotten the password and want to disable that Content Advisor on internet explorer, then you can do it by the following simple method.
How to Remove or Reset the Windows Content Advisor Password
1. Open regedit.exe (Start > Run > (write regedit) > hit Enter)
2. Now navigate to key
Rooting an Android Device means, hacking its Software to get the Super-user rights. Just like the Windows 7 GOD Mode in computers, you can perform each and every task by rooting your android device.
The concept of rooting is not new, but it got popularity after the launch of iPhone and Android. Rooting can be done on almost each and every Device/OS, from Nokia’s Symbian to Windows. In iPhone industry, rooting is called as Jail Breaking, as it breaks limitations of the phone.
Pros of Rooting an Android Device Phone or Tablet
Pros of Rooting an Android Device :
Unlock Hidden Features like Multi-touch :
Rooting allows you to get the multi-touch enabled on your phone.
Ability to add more home screens :
e.g. If your phone is limited to 3 home screens (in case of Android 1.5 and 1.6), then rooting will allow you to get 5 home screens.
Multi-Language Support :
Rooting allows you to install your desired fonts onto your Android Device.
e.g. If your device can’t read hindi/marathi or filipino SMS, web-pages and PDF Files, then you can replace the original android font file with the new one. Read how to install hindi/marathi language fonts on Android.
Ability to overclock the processor :
Rooting allows you to overclock the OS kernel, so that device speed could be increased from what it comes with factory settings.
To customize the interface :
Rooting allows to customize total interface and appearance on your android device e.g. themes, wallpapers, screensavers, widgets etc.
Enhancing SD-Card Capabilities :
Rooting allows to enhance SD-Card abilities like Cache on SD-Card, and install apps directly on your device SD-Card, so that its internal memory could be freed.
Full Back-up :
Rooting allows to backup all your device apps and data.
Tethering to use PC Internet :
Rooting allows you to access the PC Internet on your Android Device. (via LAN Cable)
Ability to install Unofficial Versions of Android :
Rooting lets you install the custom and unofficial android versions on your device, which may provide better functionalities as compared to the official version..
Ability to install 3rd Party Custom ROMs :
Custom ROMs can provide many extra functionalities to your Android Device. e.g. You can install another OS on the android, and make it a dual-booting device.
Cons of Rooting an Android Device Phone or Tablet
Cons of Rooting an Android Device :
Voids Warranty :
Rooting your Android Device may void its Manufacturer’s Warranty.
Unexpected Problems :
Your android device can suffer from Unexpected Problems after rooting. e.g. a small portion of touch-screen may not work or something like that.
No automatic updates :
After Rooting, your device will not get automatically updated to the latest version of android.
Security Vulnerability :
After rooting, your device becomes Vulnerable to the threats. And then any malicious software can enter into your device root files and make them corrupt.
Biggest Disadvantage :
The biggest disadvantage of rooting is, if your device gets stuck during Rooting, then there is no option except throwing it out.
Have you ever tried to use the Web Browser Address Bar as a Calculator.
With Google : You can write the calculation in Google Search Box, and your results will appear when you hit the enter key.
How to Use Browser as a Calculator With Google
How to Use Browser as a Calculator With Google
This calculation is done by the Google Servers, and sent to you as a search result. Google also has a number of Key Combinations for various data look-ups like Current Time in New York, 1$ in INR etc.
How to use Web browser as a calculator
Without Google : Though the Google can perform your calculations but what if you have no access to the internet?
If you get into some situation, where you want to use browser as a calculator without using the internet, then You can follow this simple procedure,
1. Go to the browser Address Bar,
2. Write javascript: followed by the desired calculation, and press the enter button.
Benefits of using this offline calculator : You can also perform the complex calculations by using this offline browser calculator, which can’t be done by the Google Calculator.
How to Use Browser as a Calculator Without Google
To get the complete supportable mathematical functions list, you can visit the Mozilla Developer Docs.
Here are some example javascript codes :
1. javascript:Math.sqrt(32) [To find the square root of a positive number]
2. javascript:Math.pow(3,9) [To find What is x to the power of y]
3. javascript:Math.random() [To find random number between 0 & 1]